• Home
  • About
  • Archives
  • Contact

Kristen Anne Glover

Five in Tow

  • Marriage
  • Parenting
  • Faith
  • Christmas

Simply Homemade: Butter Toffee

Simply Homemade

Like most families, candy and cookie making is a part of our Christmas tradition.  We have our favorites–you know, the goodies we have to make every year or it’s just not Christmas.  We always made extras to give away because sharing food traditions is part of the fun of the season.

Special food gifts are perfect for gift-giving.  They don’t have to be complicated to be delightful.  In fact, today’s gift idea is one of the easiest, but most spectacular, food gifts I’ve ever made: toffee. 

toffee

Homemade toffee

Rich, buttery toffee requires only four ingredients (and one of those is optional).  You can whip  up a batch in about half and hour, but the results are so impressive, it’s hard to imagine that something so decadent could be so easy.

With those credentials, I think it’s safe to say that toffee is the perfect food gift for a simply homemade holiday.  Check out the recipe and you’ll see what I mean.

Homemade Butter Toffee

Ingredients

2 cups of high-quality, unsalted butter (4 sticks)

2 cups white sugar

1/4 teaspoon salt

2 cups dark chocolate chips

2 cups chopped, toasted almonds (optional)

Other Stuff You Need

A candy thermometer

Parchment-lined cookie sheet or jelly roll pan.  A silicone liner works well in place of parchment if you have one.

How to Make This Yumminess

In a heavy saucepan, melt the butter and sugar together over medium heat.  Stir constantly until the sugar is completely dissolved.  Don’t rush this step–the sugar has to dissolve or the toffee will turn grainy and soft.  You may need to turn down the heat to give the sugar time to melt.

Try not to slosh the sugar mixture around in the pan.  You do not want undissolved sugar crystals to get in to the mixture or, you guessed it, bad toffee will result (as if there could be such a thing as bad toffee).

Making toffee

Making toffee

Once the sugar has dissolved, you can turn up the heat to medium-high, stirring almost constantly to keep it from scorching.

The mixture will turn bubbly and darken from a lemony color to a rich, toffee color as it cooks.

toffee recipe

The lemony stage

You will notice that I switched from a spatula to a whisk once the mixture started to bubble.  Whisking helps to incorporate the butter and the sugar.  You do not want the butter floating on the top because that will not make toffee.  That will make…something else.  Mix it in! 

Using a candy thermometer, bring the mixture up to about 298 degrees (it won’t hurt it to go a little over).  This is the hard crack stage.  Toffee cooked to this stage will have a nice crunch and flake into layers when you bite into it.  Yum-o. 

Flaky toffee

It takes a bit to get the toffee to the right temp, so while you’re waiting, you might want to taste the chocolate chips to make sure they are worthy.

As soon as the toffee is up to temperature, immediately pour it out onto the parchment paper.  Working very quickly, spread it out as thinly as possible.  You will only have a minute or two to make this happen because the toffee cools very quickly.  It will begin to resist spreading, and once it does, you’re done.

Sprinkle the chocolate chips over the entire thing.  When they soften, spread the chocolate over the toffee and follow with the nuts, if desired.  Gently press the nuts into the mixture so they don’t all fall off as soon as you break the toffee into pieces.

Put the cookie sheet in the refrigerator to allow the chocolate to set.  Once the candy is completely cool, break it into pieces and package into pretty little containers for giving!

Pretty packaging

Pretty bowls make great containers for giving

One batch of toffee makes three nice-sized gifts for teachers, neighbors, coworkers, or friends.  Be sure to take some care in packaging because presentation can elevate a simple gift into something truly special!

If you plan to send the toffee in the mail, package it in several air-tight layers (Ziploc baggies inside of other Ziploc baggies inside of a cute little gift bag) so that the toffee arrives as fresh as possible.

Toffee for giving

Toffee for giving

If you really love someone, you can give them the whole shebang (minus the pieces you “tested,” of course).  A lovely glass cracker jar is the perfect container.

toffee packaged

As an aside, it’s best not to put these gifts under the tree while they’re waiting to be gifted or you  might have to make up another batch.  Toffee is hard to resist.

*Option: Salted Toffee

Take the toffee up to the next level of sophistication by making it salted.  Oh. my. goodness.  To do this, simply omit the salt in the recipe.  Then, after you spread the chocolate on the finished toffee, allow it to cool slightly on the counter.  Once the chocolate has just begun to set, sprinkle freshly-ground sea salt over the surface.  Refrigerate to continue setting the chocolate.

Drool. 

Wait!  I didn’t get a picture of salted toffee.  I guess I’m going to have to go back and make another batch!  Oh, the burden.

Tomorrow’s Simply Homemade project involves dirt and a pretty little pot.

Crafts 6 Comments

Disney Surprises

Yesterday, I told you the beginning of our Disney surprise for the three oldest children.  They had already received their first clue at home and were on their way to the second, but they had no idea where they were headed.

The prevailing assumption was that we were going to a movie theater to watch a Disney film, perhaps even Peter Pan.

But then we pulled up to Nana’s house.

“Get out of the car!” I sang.  I had been singing Disney songs the entire way but the kids weren’t particularly interested in my vocal acrobatics or my touching rendition of “Part of Your World.”  If I didn’t know better, I’d say they were blocking me out.  “Get out of the car!” I sang again.

The kids stared at me.  “Get out of the car?” Faith repeated.  She sounded a little worried that we might have arrived at our destination, and while Nana’s house is great, it certainly didn’t blow her mind like Daddy promised.

“Aren’t we going to be late for the movie?” Jonathan asked.

“I don’t know, but if you don’t hop out, you won’t get your next clue,” I teased.

The van emptied immediately.  Children ran into Nana’s house and children squealed when they saw Nana and children read Nana the first clue and told her all about the fun they’d already had.  Nana told all the children to calm down because she had to go to the bathroom.

But really, she was bringing me her suitcase to load up into the back of the van with the others.  Oh, the trickery!

After the suitcase was stashed, we lined the kids up on her couch.  I gave them each a wrapped package with a little note that read:

Bibbidi bobbidi boo!

There’s an adventure waiting for you!

You’ll need a bit of faith,

A lot of trust,

And don’t forget your pixie dust!

(Have you ever Googled “bibbidi bobbidi boo?”  I have.)

Moving right along.

The kids opened their boxes.

DIY Pixie Dust

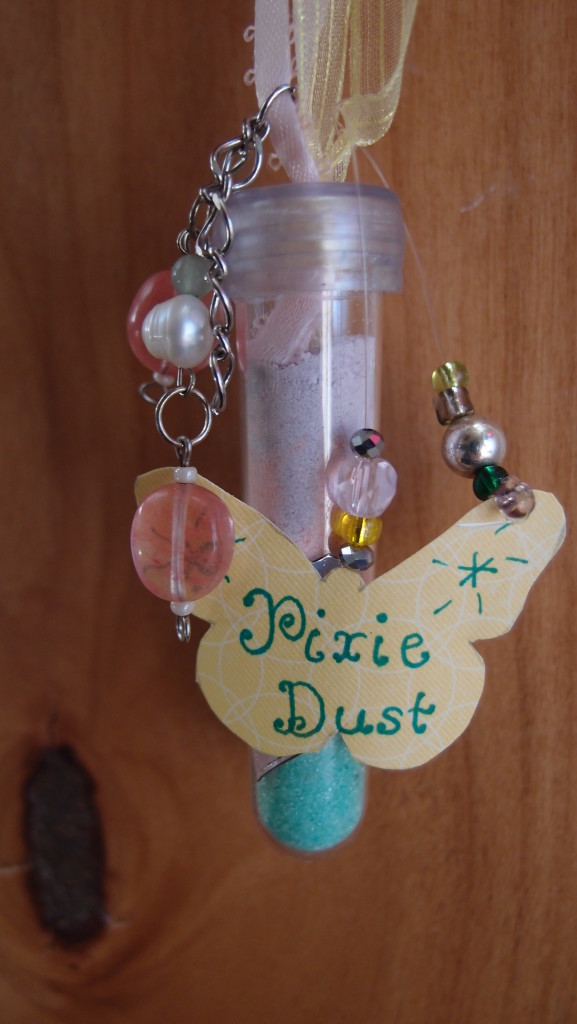
Each child had a little pixie dust necklace.

DIY Pixie Dust

“Pixie dust!  Can we eat it?” asked the child who did not care about being able to fly.  He’s going to regret that when Captain Hook gets ahold of him.

DIY Pixie Dust

But, in point of fact, he could eat the pixie dust.

After looking high and low and trying all sorts of things to create little vials for pixie dust (including taking apart little light bulbs so I could use the glass containers, which totally didn’t work) I found these little plastic containers in the bead section of my local craft store.  They cost $0.49 each.  Score!

Plus, they came with a plastic lid that already had a hole in the top for stringing ribbon.  Yeah me!

I created the pixie dust by mixing a bit of sugar with just a drop of liquid food coloring.  I created several colors, then baked them in the over at 350 for 10-15 minutes, just until the sugar was no longer damp.  I layered the sugar into the vials, added pretty ribbons and beads, a few stickers, and of course, Tinkerbells.

Pixie Dust

I thought this might be a dead-giveaway for the surprise, but I was wrong.

With the video camera rolling, I prodded.  “So, you have pixie dust.  What do you need pixie dust for?”

“Flying!”

“Yes, flying!  So, where do you think you’re going?”

“Neverland!”

Face palm. 

“Get in the car.”

Five in Tow

These children would make terrible detectives

Nana hopped in the car too and we all headed off to the airport, although the kids didn’t know that.  The airport is all the way through Seattle for us, and I wondered how long it would take the kids to figure it out.  So far, their powers of deduction left a lot to be desired.

But, they were about to find another clue.

Kya happened to peek in the back of the van.  “There are suitcases back there!” she yelled.

Rats.

“Suitcases?  We are going to Beachwood!” Jonathan shouted.  “I knew it!  I thought of that!  I thought of Beachwood!”

“Jonathan, Beachwood is in the other direction,” Nana noted.

“Then we’re going to Whistler!  I knew it!”

“Whistler is in the other direction.”

“What’s south?” I hinted.

Silence.

“Nothing,” Faith said.

I’m sure she meant no offense to Oregon and California.

We zipped right past Providence Classical Christian School, where Jeff used to work, so that meant we weren’t picking up Kiri and Moira for a movie date.  We zipped right past the Space Needle,

Seattle Space Needle

and said many laudatory things about the glories of Mt. Rainier on that particular day.

Mt. Rainer

Too bad the children were not particularly interested in the view.  They were languishing in the backseat.  Ahahahaha….this adventure is taking forever.  Weeping and gnashing of teeth and are we there yet?

I decided to send them to Argentina.  So I took the exit to the airport.

“Are we getting off the freeway?” Faith asked.  “Are we going to the airport?”

Perhaps…

The exit to the airport curved around and put us on another freeway for a second.

“Aw man, another freeway!”

But wait…

“It is the airport!  We’re going to the airport!  Are we getting Grandma?”

Never mind the fact that my house was in a crafting state of despair and there was no way I’d let Grandma come over with it looking like that no matter how much I’d like to see her, I let the kids ponder that possibility.

I zipped my little blue van-that-does-not-indicate-I’m-a-soccer-mom right under a glaring DEPARTURES sign, but no one read it.

I zipped my little blue van-that-does-not-indicate-I’m-a-soccer-mom right past the loading zones just to tease the children and not because I misread the signs that led to parking.

“Why are we at the airport?  Why are we at the airport?  Why are we at the airport with pixie dust and a bunch of clues about Disney?”

I don’t know, kids.  Why are you?

We parked.

“Okay,” I said.  “Time for another clue!”  We tumbled out of the car and I opened the back of the van, which was stuffed with suit cases and three bags loaded with Disney-themed treats.  I handed each of them another wrapped package and started rolling the video again because surely, surely they were going to get it now.

Wrapping paper flew into the air and each child got one of these:

DIY Disney shirts

Personalized reverse tie-dye Disney shirts for Kya, Faith, and Jonathan

“Huh.  Mickey Mouse shirts.  Thanks, Mom.”

Face palm.

“Put them on,” I commanded while pondering the fact that this generation of uneducated children has no idea that Mickey Mouse is Disney.  This generation of children knows nothing of The MOUSE!

It’s a shame.

“They just don’t get it,” Nana said, shaking her head.  She was taking it hard.

“So.  Let’s review,” I said, holding on to the last fragment of hope that my children could put the pieces together.  “What do we know about Mickey?”

“He’s a mouse?”

“He has a clubhouse?”

“He’s from Disney!” Kya came in for the save.

“Yes!  Disney!  So.  We are at the airport with pixie dust necklaces and Mickey Mouse shirts…where do you think we’re going?”

The video was rolling, waiting to capture this precious moment for all posterity.

But.

They didn’t get it.

Paris Tuileries Garden Facepalm statue

Face palm

It’s Disney, people!  Disney! 

I wanted to shout it but I didn’t.  “Okay, pause,” I said, putting the video camera away. This was going to take a little more work than I thought.

Stay tuned tomorrow for another edition of, “How long will it take these kids to figure out they’re going to DISNEY?”

(Also, I’ll have a t-shirt tutorial up later this week so you can make your own reverse tie-dye mouse shirts in case you want to test your child’s deductive powers by surprising him or her with a trip to Disney).


Humor, Parenting 18 Comments

DIY Variegated Coffee Filter Wreath

DIY Coffee Filter Wreath


A few days ago, I posted this tutorial on how to paint tile.  It was nice and everything, but what many of you wanted to know is, “How did you make that wreath?”

Coffee Filter Wreath Centerpiece

It’s beautiful, isn’t it, and perfect for spring.

The best part is, it was super easy to make (albeit a little time consuming).  It’s also inexpensive because I’ll let you in on a little secret: it’s made entirely out of coffee filters.  Hard to believe, I know!

All of the instructions, with step-by-step photos, are posted over at Embracing Creativity today.  Won’t you stop by and say hi?


Decorating 4 Comments

Next Page »
I believe you can find grace for the mother you are and help to become the mother you long to be—a mom who has the freedom to choose the better things and enjoy her kids right now.

Recent Posts

  • Mr. Whitter’s Cabin
  • Stuck
  • When Your Heart is Hard Toward Your Child

Popular Posts

  • Painting Tile and Other Ways to Save an Ugly Fireplace
  • Simply Homemade: Craft a Peacock Lamp Shade

Sponsored Links

Copyright © 2023 Kristen Anne Glover · All Rights Reserved · Design by Daily Dwelling

Copyright © 2023 · Flourish Theme on Genesis Framework · WordPress · Log in