• Home
  • About
  • Archives
  • Contact

Kristen Anne Glover

Five in Tow

  • Marriage
  • Parenting
  • Faith
  • Christmas

Simply Homemade: Bells and Burlap Wreath


Simply Homemade

This post is part of the Simply Homemade series.  To see the rest of the posts, start here.

Well, things have not been going as planned over at the Glover household.  I don’t know about you, but Christmas is a study in flexibility, and I don’t mean seeing if you can still touch your toes after eating all that peppermint bark.  Schedules get rearranged, simple errands take longer than usual, and sometimes, instead of doing the things you should, you opt for a long winter’s nap.

So.  Today’s post was supposed to involve fabric, scissors, and the Oh-So-Scary sewing machine.  It doesn’t.  My plans were derailed because someone forgot to take pictures of the final result of the sewing project and didn’t realize it until the dark of night when it was too late to do anything about it.

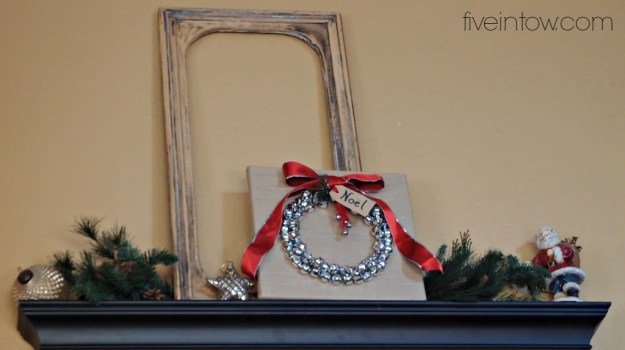
Enter the Backup Plan.  Instead of doing a project involving minimal sewing skills, we’re doing to do a project involving minimal gluing skills.  Yippee!   Here’s a sneak peak:

Bells and Burlap Wreath

Bells and Burlap Wreath

Okay, that wasn’t really a sneak peak.  That was more like the reveal.  But it’s Christmas, and aren’t we all tired of waiting for the good stuff?

Now you’ll just have to stick with me while I back this train up and tell you all about my Bells and Burlap Wreath after you’ve already seen it.

Whilst walking around my favorite charity the other day (ahem, Hobby Lobby), I spotted these fabulous burlap canvases on sale.  I snagged one in a lovely shade of 12×12.

Burlap canvas

I wasn’t quite sure what to do with it until we walked past a whole herd of jingle bells, also on  sale.  Now, I’ve always wanted to make a jingle bell wreath but I’ve never done it.  I said to myself, “What could be easier than making a jingle bell wreath on burlap?”  Practically nothing!

We hauled it home and got started.  This is what we did:

Step 1: Make a Circle

DIY Jingle Bell Wreath

Find a plate or a bowl to use as a guide to draw a circle on the burlap.  Do not center it.  Leave more space at the top of the canvas than the bottom because you will be adding a bow later and you don’t want it looking weird.

Circle on Burlap

Step 2: Add Jingle Bells

Jingle Bell Wreath

I bought a package of 75 bells for this project (and hoped it would be enough).  You could use more, but I wouldn’t use any less.  I was barely squeaking by with the bells I had but I didn’t want to go back to Hobby Lobby because I swear, it costs me $50 just to walk in the door. 

Using a hot glue gun, glue the jingle bells to the burlap.  Place them together side-by-side on the circle you drew.  Then, create an inner circle but this time, space the bells a bit apart so they don’t look too planned or perfect.  Wreaths should be random!

Kya, my seven-year-old daughter, put the bells on the burlap and you can see they got a little bunchy at the bottom, but it doesn’t matter.  After you create an inner circle, randomly glue a few bells on top of the bottom two rows.  Adding the extra layer of bells makes everything even out.  See?

Jingle Bell Burlap Wreath

Step 3: Add a Bow

DIY Jingle Bell Burlap Wreath

Make a bow with some nice wide ribbon and secure it to the burlap with a bit of glue.  It helps to tack down the dangling parts of the bow too so it all stays where it should.

Also, I should have ironed it.  Oops.

Now, you could be done at this point.  I thought I was until I asked my husband what he thought of my project and he did that thing that husbands do where their eyes glaze over and they say, “Ummm…”

Apparently, it needed a little something-something more.  So…

Step 4: Embellish

If you look back to the first picture in this post, you’ll see that I added “stuff.”  But wait–don’t scroll up.  Here it is again:

Bells and Burlap Wreath

Jeff thought my Bells and Burlap wreath needed a little green.  He also thought there was too much space in the middle.  I could have added another layer of bells, but like I said before, there was the whole problem of entering Hobby Lobby for “one thing” and coming out $50 poorer.

Instead, I decided to use what I had on hand (what a concept).  I added a cardboard gift tag with the word “Noel” (because I like that word) and some smaller bells on ribbon.  There’s also a sprig of green, just for my guy.

He said it was an improvement so I kissed him.

Step 5: Give (or Keep) Your Bells and Burlap Wreath

Bells and Burlap Wreath

You could give your project away.  That’s the whole point of this series, right?  Or, you could realize that the Bells and Burlap Wreath is the perfect addition to that shelf you have in the stairway.

Ahem.

Looks like I might have to go back to Hobby Lobby after all.

P.S.  Save yourself the trouble and make two from the get-go.


Save

Decorating, Decorating, Home 3 Comments

Simply Homemade: Whipped Coconut Body Butter

Simply Homemade

Whipped Coconut Body Butter is part of our Simply Homemade gift series

The December days are flying by.  Christmas packages are arriving in the mail and the presents are starting to gather under the tree.  Everything is bright and glorious and full.

It’s getting harder to find time to make gifts now that the days are short and swift.  If you’re still trying to pull off some homemade magic for the loved ones on your list, you know how important it is to keep things simple.

Today’s Simply Homemade project is perfect for that.  It requires just two ingredients and less than five minutes of your time (and most of that time you can be doing something else, like wrapping presents or sipping cocoa).

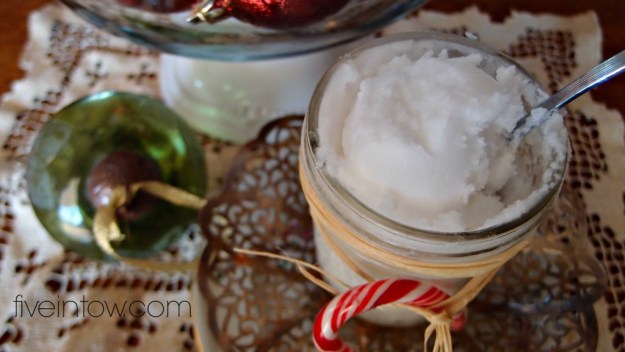
The result of your minimal efforts is a luscious gift perfect for the cold, dry days of winter.  It’s something I use every day to keep my skin from shriveling up like a prune here in the desert.  I call it Whipped Coconut Body Butter infused with Peppermint.  

Whipped coconut Body Butter

Sounds like a mouthful, right?  Don’t worry–I promise it will be easier than eating just one Christmas cookie.

Before we get started, let’s talk about the main ingredient in this gift: unrefined coconut oil.    You might have some in your house right now.  I hope you do.  It is amazing stuff.

I use unrefined coconut oil for just about everything.  I cook with it, bake with it, eat it raw, put it on my hair and skin, and even use it as a sunscreen.

As a skin moisturizer, unrefined coconut oil is unparalleled.  Coconut oil is antifungal, antibacterial, and so full of antioxidants, it actually fights the free radicals that damage your skin.  The oil soaks right into the skin on a cellular level, and all those antioxidants go to work protecting and even restoring the skin.  I don’t know about you, but my skin isn’t getting any younger, and it could use a little restoration now and again.

All of that and unrefined coconut oil has no artificial colors or scents.  It’s perfectly safe for babies and adults, not a bit harmful to the environment, and won’t even stain your clothes.   Sounds fabulous, right?

The only problem is, coconut oil is a solid unless temperatures get about 76 degrees.  I don’t know about you, but I don’t keep my house that warm in the winter.  That means my coconut oil has an unfortunate tendency to turn rock hard whenever the temperature falls.

Chiseling coconut oil out of a container is not one of my favorite things.

That’s where this tutorial comes in.  I have a very easy solution to the coconut-chipping dilemma: we whip it.  Now, I know you thought I call this stuff “Whipped” Coconut Body Butter because it sounds fancy.

But no.

We really need to whip it.  Aerating the coconut oil keeps it soft and supple when the temperatures dip.  You don’t even need a tutorial for this (I mean, you kind of get the idea when I say we need to whip it) but since we’re here….

Whipped Coconut Body Butter with Peppermint

Ta-Da!

Ingredients

1 c. unrefined coconut oil

Peppermint Essential Oil, about 20 drops

Self-Explanatory Instructions You Really Don’t Need

Coconut oil

Scoop (or chip) the coconut oil into a mixing bowl fitted with a whisk attachment.  I did not even measure.  We all know what one cup looks like, right?

Whip the coconut oil.  It will turn fluffy and glossy, and soft peaks will form when you lift the whisk out of the bowl.  This is good.  The more air you can incorporate into the coconut oil, the softer it will stay.

I let my mixer run for a good five minutes, scraping down the bowl occasionally to make sure no little coconut oil bits were escaping.

When it has just about doubled in volume, add the peppermint essential oil.*  I added about 20 drops to my coconut oil to get the scent and potency I wanted, but you can adjust according to your tastes.  Just be aware that the peppermint scent will develop a bit as the mixture cures.

Whipped Coconut Body Butter

Whip the coconut oil just long enough to blend in the oils, and you’re done!  Carefully scoop the coconut oil into pretty little Mason jars for giving, being careful not to compact the oil too much (remember, we want to keep those air bubbles fat and happy).

DIY Whipped coconut Body Butter

To use: Apply Whipped Coconut Body Butter like you would any other moisturizer.  It’s great to put on right out of the shower or before bed.  I also rub it into my hair and scalp before a shower as a per-conditioner, or to the ends of my hair as an after-shower treatment.

Allow the coconut oil to absorb and continue on with your regular Christmastime festivities!

A Word About Peppermint Essential Oil

*You can find peppermint essential oil at just about any health store or in the health section of many grocery stores.  It is a fabulous oil to have on hand for home remedies (nothing treats a headache better).  I added it to the Whipped Coconut Body Butter not only because it smells Christmas-y, but because peppermint essential oil increases circulation, restores tired feet and legs after too much shopping, soothes achy joints, treats heartburn and stomach yuckiness from eating too many Christmas goodies, and even helps to fight the colds that could ruin Christmas morning.

All around, it’s great stuff.

Just know this: if you’re serious about using peppermint, or any other essential oil, be sure to educate yourself and purchase the highest-quality oil you can.  Quality oils do not necessarily cost any more than the stuff you can pick up at any store, but they are created using techniques that ensure the highest potency, so it’s worth doing some homework.  I purchase my oils at Rocky Mountain Oils but there are many great companies to choose from.

Now, Back to the Body Butter

While you were reading about peppermint oil, I put a jar of Whipped Coconut Body Butter under the tree.  That’s another gift, done. 

DIY Peppermint Body Butter

Tomorrow’s Simply Homemade gift will involve fabric, scissors, and thread.  Can’t sew?  Don’t worry!  You’ve totally got this. 


*The posts in this series may contain affiliate links for your convenience.

Save

Crafts, Health and Beauty 6 Comments

Simply Homemade: Pocket Survival Kit

Simply Homemade

When it comes to making simple, homemade gifts for girls, things are easy.  Girls love hair bows, ornaments, pretty smelling bath bubbles, and just about anything Pinterest can conceive of.

Boys are another story.

Boys want things that shoot and cut and require batteries.  I don’t know about you, but I cannot crotchet a remote control helicopter.

All season, I have wondered what I could make that my outdoor-loving, snake-catching, fast-living boy would like.  I wanted him to more than like it, since I was going to put time into making it.  I wanted him to love it.

I wondered and wondered about it until one day, we met a man at a flea market who was selling knives and various outdoor supplies.  He happened to have a pocket survival kit that my son went crazy over.  I had found my solution.

A pocket survival kit is just what it sounds like.  It’s a small tin packed full of all the little goodies a boy might need to survive the wilds of his own backyard (except food and water–you want the boy to come home sometime). They sell them pre-packaged online at various sporting websites, and, apparently, at El Paso flea markets.

The great thing is, you can make one for much less money.  This is the perfect gift to make yourself because it gives you control over what goes in the box, and you can make it as fun or functional as you like simply by changing the quality and type of items you include.

You will also find that this Pocket Survival Kit is a great resource for teaching your child real-life skills like how to read a compass or how to start a fire.  It’s the kind of gift that leads to memorable moments of teaching and learning together.

Like all the gifts in this series, it’s completely easy to do.  All of the contents are readily available at any store that sells sporting or outdoor supplies, and most of them are very inexpensive (unless you decide to upgrade to better gear).

Here’s how you can make a Pocket Survival Kit for your own mini survival man (or woman).

How to Pack a Pocket Survival Kit

Pocket Survival Kit

You will need a small tin (an Altoids box or Sucrets tin is perfect). 

Everything you pack is going to have to go inside of this tin, which should be small enough to fit in your wilderness man’s pocket.  That means you need to get the smallest, yet most functional, versions of any or all of the following items:

A mirror (this is for signaling for help)

Laser pointer (also for signaling)

Emergency whistle (sometimes these are included in pocket knives or lasers, so keep an eye out for a dual-function tool to save space)

Pocket knife/multi-tool

A lighter***

Compass

Fish hooks

Fishing line

Rappelling clips (carabiners)

Wire saw

Emergency blanket (this will be too big to fit in your tin unless you cut it down to size or use a vacuum sealer to compress it)

Water purification tabs (because what could be cooler than drinking out of a mud puddle?)

Small bag (so you can purify said mud puddle)

Various sizes of safety pins

Razor blades, if the recipient knows how to handle these (secure them under the duct tape in any case)

Survival Tin

Once you’ve gathered all your items, pack everything in the tin.

Mark the back of the box with the Morse code signal for SOS.  Later, teach your child how to use the laser pointer or mirror to signal for help.  It’s fun!

SOS

SOS

If you look at the picture closely, you will see that I covered the tin with duct tape.  I also put another strip on the bottom.  You never know when duct tape could save a life. 

Close it up and your Pocket Survival Kit is ready for giving!

This makes a great stocking stuffer or gift for an outdoorsy young man or woman.  However, please use your discretion when giving a gift like this unless you are confident of the recipient’s maturity.  Be sure he or she knows how to handle the tools properly and is responsible with them.  If you have any question about any part of the kit, exclude it.

My nine-year-old son is very responsible and has been taught how to use each of the components of this box, and he has been   I would not worry about him abusing any of them.  But not every nine-year-old boy is the same!

Fire starters

Of these fire starting options, a lighter is probably the best bet

A note on fire starters

You will notice that I included several fire-starting options in the photo above, but only listed a lighter to included in the box.  Lighters are great fire starters, but you can choose any option you like.  Matches, magnesium strips, or even magnifying glasses can work.   I actually put several in the kit for my son because I opted to leave the emergency blanket out.

If you have to choose, a lighter is by far the most reliable in a real emergency situation.  If you pack a magnifying glass, it could be cloudy.  Matches get wet.  Magnesium strips are hard to use to build a real fire.

Choose the option that you like the best and which will be most interesting to your child.  Then, teach him how to use it safely and efficiently.

There you have it, a fantastic, simple gift for the boy in your life.  If he’s anything like my son, he’s going to love it.


*The posts in this series may contain affiliate links for your convenience.

Save

Crafts, Reviews 2 Comments

Next Page »
I believe you can find grace for the mother you are and help to become the mother you long to be—a mom who has the freedom to choose the better things and enjoy her kids right now.

Recent Posts

  • Mr. Whitter’s Cabin
  • Stuck
  • When Your Heart is Hard Toward Your Child

Popular Posts

  • Mr. Whitter's Cabin
  • Stuck
  • When Your Heart is Hard Toward Your Child
  • Why She's Sad on Sundays
  • Failing Grade
  • I Should Have Married the Other Man

Sponsored Links

Copyright © 2025 Kristen Anne Glover · All Rights Reserved · Design by Daily Dwelling

Copyright © 2025 · Flourish Theme on Genesis Framework · WordPress · Log in